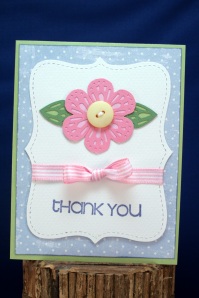
I said I didn't want to show it quite yet because I did something really cool ....so cool I thought it deserved it's own post and being that I am keeper of the posts I can do stuff like that.... so...without further ado here is my super fabulous finished card.....

bet your thinking it's not so fabulous...your probably ready to storm off in a huff because I made you wait for a plain ol ho-hum card right...well stop right there... it's not really the card itself that is so fabulous...although it is stinking cute...but it's the detail on the card I want to share with you...take a closer look.....

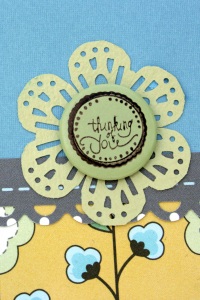
see that super cute flower...I made that...I stamped the sentiment on the jumbo brad with stazon...cool right...but that is still not what I wanted to show you about this awesome flower...what's totally awesome about this flower are the petals...more specifically...what I made them with...got any guesses what I used?
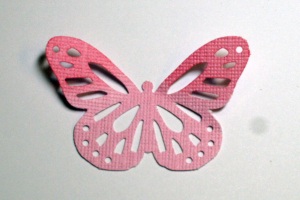
I made them with....drum roll please...
this...

Cool right! OK I know it's not man on the moon spectacular or even Bon Jovi live awesome ..but on the scrappy scale of cool...it's up there...at least it is on my scrappy scale. I just love when I get brilliant ideas like this..(inserting random thought here...when I typed brilliant couldn't help but think of Jerry Espinson from Boston Legal...man I love that show)...anyways...like I said I thought it was a totally brilliant idea. Of course it was 1 a.m. when I came up with it and I'm easily impressed at that hour (that's what she said...ba dum dum).
Anywho... regardless of whether or not your super impressed or just mildly interested....I thought I would share the super complicated instructions...sorry no video tutorials here...I need to have my master Obi-Wan teach me the ways of the video camera next time I see her...but I did take some photos as necessary for any of you who need visual aids...so here they are...the super complicated instructions...
How to make a filagree flower...
Step 1...punch 3 butterflies
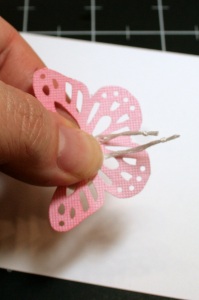
Step 2... cut the top part of the butterflies wings as shown in the picture...

Step 3: Assemble your butterfly petals as shown...

Step 4: Add a cute brad, button or other detail for the flower center and voila...
you have an adorable filigree flower as shown here...

Easy peasy lemon squeezy right! Super cute right! I even earned extra extra bonus points for creativity on this one because I used some of the loopy bazzil border to make the leaves for my flower.
Since I had so much fun making the first one I decided to play mad scientist and keep experimenting with the punch to see what the heck else I could come up with...and what I came up with was sheer paper botanical bliss...at least I think so.
For my second incarnation of the filagree flower I didn't go too crazy...just did a slight variation of the original flower...this time I mounted the 3 petal pieces on a contrasting background and trimmed around them...ooh soo pretty...

Decided my flowers needed some leaves so with a few more snips ala Edward Scissorhands I was able to create some adorable foliage for my fauna...again super easy to do.. (sorry no pic...I was in the zone...couldn't stop for the camera) ...you just have to take one of your petals and trim 1/2 of it off so it looks like a tear drop shape....looks super dooper cute with different shades of green.

So after I mastered the art of leaf making my mind was in creative overdrive trying to think of even more things to do ... and then bam ...the idea hit me...a flower bud! So a little inking here...a little gluing there and tada.......

Jaw dropping cool right! I even amazed myself with this one...looks even prettier in person. And yes I know ink here and glue there are super vague instructions...don't worry I got your back on this one...took some pictures for you so you could see how easy it is to assemble. I also jotted down the directions for the 3 dimensional version I made to go with my bud....
here's how you make the bud...
Step 1: Punch 1 butterfly...DO NOT CUT IT!
Step 2: Using a darker color, ink the top edges of the top of the wings as shown...then flip it over and ink the lower edge of the lower wings.

Step 3: Cut a small piece of white embroidery floss...tie a small knot in each end...trim open ends close to knots...fold floss in half...place in center of butterfly as shown...

Step 4: Bring the top edges of the butterfly wings together and overlap them (inked edges facing in) to make a cone shape as shown...use some adhesive to secure the wings in place. Note...in the picture mine are not completely overlapped...use the holes on the top of the wing as guide to line them up correctly...

Step 5: Pinch the bud cone slightly so it flattens a bit and then it's ready to adhere to your card or LO.
And here's how you make the dimensional flower...
Step 1: punch 6 butterflies and cut to make 6 petals
Step 2: ink the outside edge of each petal
Step 3: make one flower on cardstock, trim away excess cardstock
Step 4: make second flower over first flower only adhering petals in the center
Step 5: roll the edges of the top petals up to add dimension
Step 6: add embellishment to flower center
So are ya impressed yet? I hope so!
I guarantee if you own this punch you will be getting a lot more use out of it...and if you don't own this punch...what ya waiting for!

No comments:
Post a Comment